Administration
How to re-use user license of employee who left the organization for another user?
Please find the below steps:
You can disable the user who has left the organization with below steps:
- Right click on Gathr floor –> Administration –> User & Group –> View Users
- Drag and Drop view on the Gathr floor
- Right click on the User ID of the User to be disabled –> User –> Disable User
The user will be disabled.
Now, create new user using below steps and assign roles.
Right click on Gathr floor –> Administration –> User & Group –> New User
Provide the Details:
- First Name:
- Last Name:
- User ID:
- Password:
- Confirm Password:
- Email:
Click on ‘Add User’.
- Right Click on Gathr floor –> Administration –> User & Group –> View Users
Assign Persona:
Right click on the ‘User ID’ of the desired user –> User –> Enable User as a –> Select the Persona you want to assign.
Assign Roles
Right click on the ‘User ID’ of the user –> User –> Assign Roles
Select the required Roles –> Click on ‘Update’.
How to update SSL Certificate on Gathr in Linux Environment?
Please find the below steps to update SSL Certificate on Gathr:
Right click on Gathr floor, Click Administration > Configure > Web Server
In configure web server pop-up, provide the below details
- Protocol: HTTPS
- Keystore Password: Enter the password. This is the password used to generate the ‘. pfx’ file and shared by the IT department
- Keystore File: Click ‘BROWSE’, select the ‘. pfx’ file.
- Enter the base URL.
- Click Submit
To bring the new HTTPS certificate into effect, restart the machine or Gathr services.
Please find the below steps to restart the services in Linux Environment:
Go to the path of Gathr Setup:
#cd Klerainstaller_6.x.x.x
#cd Tools
#sh kleraservicemanagement.sh restart
Wait for a few seconds and after starting all services execute.
#sh sdlcservicemanagement.sh restart
How to execute parent operation without executing the child?
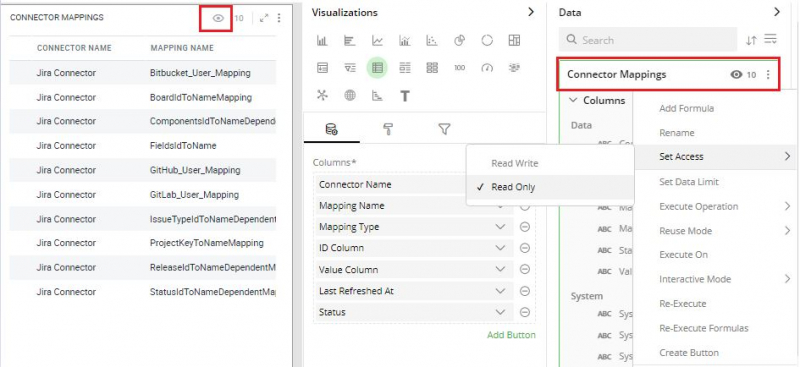
To run the parent operation without executing its child, we need to make the child operation dataset in Read-Only access mode to disable its execution.
How to make dataset read only and non-executable?
Please follow the below steps to make a dataset read-only and non-executable.
- Navigate to the required dataset under Data and Visualizations panel.
- Click on the three dots menu of the dataset -> Set Access -> Read Only. Please refer to the attachment.
- Once the dataset is set to read-only, all of its containers (views) will not be executed on Editable App execution and schedule.
The dataset that are set to Read-Only access mode show an eye icon on their top right corner.
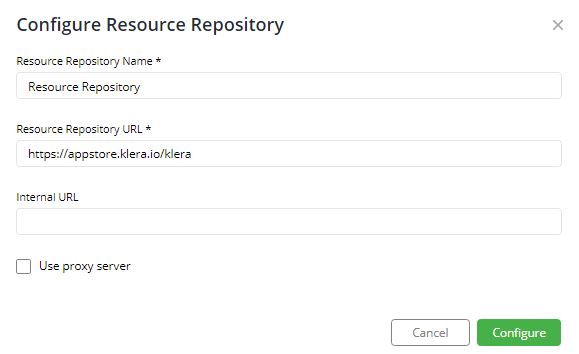
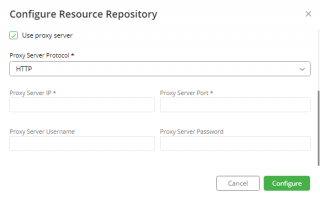
How to configure Store/Resource Repository on Gathr?
Please follow the below steps to configure Store/Resource Repository on Gathr.
- Right-click on Floor > Administration > Configure > Resource Repository
- Configure the Repository URL: https://appstore.klera.io/klera
- Also, ensure that the repository should be accessible from your machine where Gathr is installed. Please allow communication traffic from IP: – 103.159.164.53 which is the IP of FQDN https://appstore.klera.io/klera
- If the proxy is enabled in your network, please provide the following proxy details to connect and download resources from the resource repository in the form.
Please refer to the below attachment.
- Proxy Server Protocol
- Proxy Server IP
- Proxy Server Port
- Proxy Server Username and Password
How to track number of user licenses consumed?
Please follow the below steps to view number of user License consumption a. Click on the Store button available at the top right corner of Gathr Home. b. You will land on Gathr Store, search for ‘License’ in the search bar. c. Click on the 3 dots menu of “Klera User Based License Utilization Analysis” and select Install. It will start installing the app on your Gathr instance. d. Once the installation is completed, app will be available on Gathr home under ‘My Space’. e. Double click on App.
This App is intended for Gathr Administrator(s), to monitor user based license. It helps track the license consumption for different user personas.
How can I change the persona of a user?
Please follow the below steps to change the User Persona:
- Right click on the Gathr floor –> Administration –> User and Group –> View Users
- Please drag and drop the view of User on the Gathr floor
- Select the User ID –> Right Click on User ID –> User –> Enable User as
- Click on ‘Author/App User/Admin/Reader’

How can I fetch User Audit logs?
Please follow the below steps to get User Audit Logs:
- Open a new Editable App.
- Right-click on Gathr floor -> Administration -> Audit Logs -> Get Logs
- A window will open up, where you can select Time duration, Users, Activity type and click Submit.
- A dataset will be generated in the view panel, drag and drop the view on the floor.
How to take backup and restore in Gathr Linux based deployment?
Backup
Please follow the below steps for taking backup of Gathr data in Linux based deployment.
Note: Root user access is required to perform the below steps.
For creating a backup follow the below steps:
- Go to Tools directory inside Gathr setup and look for klera-snapshot-backup.sh script.
- To create a backup, execute the command sh klera-snapshot-backup.sh followed with -backuppath /path of the directory. Example: sh klera-snapshot-backup.sh -backuppath /opt/klera/klerabackup
- A message will be prompted stating klerasnapshot created successfully at /path of the directory.
- Your backup is created and available.
Restore
Please follow the below steps to restore Gathr data for Linux deployment:
For Restoring backup follow the below steps:
Note: To restore backup, user must install the same Gathr version for which the user created backup; then execute the restore script with root user access.
- Go to Tools directory inside Gathr setup and look for klera-snapshot-restore.sh script.
- To restore the backup, execute the command sh klera-snapshot-restore.sh followed with -restorepath /path of the directory. Example: sh klera-snapshot-restore.sh -restorepath /opt/klera/klerabackup
- A message will be prompted stating ‘services started successfully’ upon completion.
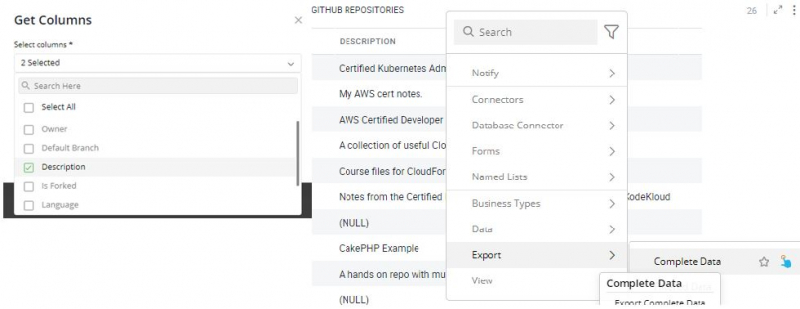
Is there a way to limit the columns that are exported to CSV?
We can limit the number of columns to export the data.
Select the container header > Data > Get columns.
Choose the columns you desired and click on “Ok”.
A new view and dataset will be created. Select the view, bring it on the floor.
Now, right click on the container header > Export > Complete data.
How to capture Gathr python and machine learning service logs?
Please go to the path where Gathr is installed.
Machine learning service:
:\Klera\Klera\KleraMachineLearningService - Create a zip file of LogFiles Folder
Script integration service:
:\Klera\Klera\KleraScriptIntegrationsService - Create a zip file of LogFiles Folder
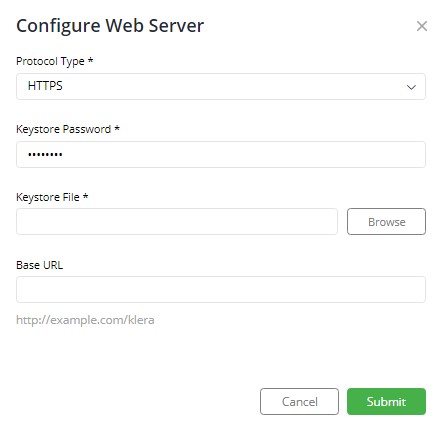
How to configure Web Server on Gathr?
Please follow the steps below to configure the Web Server to run on HTTP/HTTPS:
- Create a new Editable app.
- Right-click on Gathr floor > click Administration > Configure > Web Server.
- In ‘Configure Web Server’ pop-up, provide: a. Protocol: select HTTPS. b. Keystore Password: Enter the password. This is the password used to generate the ‘. pfx’ file and shared by IT department. c. Keystore File: Click ‘Browse’, select the ‘. pfx’ file. d. Base URL (optional): Provide URL of your Gathr instance.
- Click ‘Submit’.
- To bring the new HTTPS certificate into effect, restart Gathr services.
Prerequisites:
- You should have administrative rights on Gathr to configure the web server. Please login with admin user on Gathr.
- Ask your IT Department to share .pfx and its password.
- .pfx should match the URL that you will use to access Gathr interface.
How to capture heap and thread dumps of Gathr services in Linux environment?
To Capture heap and thread dumps of Gathr Services in Linus environment,
Please follow the below steps:
- Install dos2unix package with sudo yum install dos2unix -y
- dos2unix klera-createdump.sh
- sh klera-createdump.sh
Usage syntax: klera-createdump.sh -dumptype -cname
Following are the ways it can be used:
- If you want to take both heap and thread dump of klerapecore. (Usage: klera-createdump.sh)
- If you want to take any specific dump e.g. heap or thread of klerapecore. (Usage: klera-createdump.sh -dumptype heap/thread)
- If you want to take both heap and thread dump of a specific container. (Usage: klera-createdump.sh -cname container name)
- If you want to take any specific dump e.g. heap or thread of specific container. (Usage: klera-createdump.sh -dumptype heap/thread -cname container name)
Hello! I am new to Gathr. I am trying to create a python app that takes pieces of data in the gui of my app and writes them to an ElasticSearch database. The ES side I have figured out and it is working fine. I am unsure how or even if I can reference fields from my app in my python script.
For example, under “Selected Options” I can click on the menu then select “Operation Details” – that shows me a few variables like theme, urlstrings, filename, etc. I’d like to reference those variables (theme, urlstrings, filename) in my python script that I will import into the app. Is it possible to do this? I did read the Gathr guide on integrating python script but I am not finding (or am not understanding) this specific scenario. Thanks for any help you can provide.
Ans- Gathr has the functionality to write data to an external Elasticsearch without using Python script. Please refer the guided video that has been shared on your email.
How to start and stop Gathr services in Linux environment?
Please go to the path of Gathr Setup, we’ll find a directory with the name ‘Tools’.
Please navigate inside it with the command ‘cd Tools’ and then list it.
We will get 2 shell scripts as follow:-
kleraservicemanagement.sh
sdlcservicemanagement.sh
START:
First, run ‘ sh kleraservicemanagement.sh start ’ . After the first script executed successfully, run the second script ‘sh sdlcservicemanagement.sh start’
Similarly to STOP, run the same script in the following sequence.
sh kleraservicemanagement.sh stop
sh sdlcservicemanagement.sh stop
RESTART:
sh kleraservicemanagement.sh restart
sh sdlcservicemanagement.sh restart
To check the STATUS of Gathr service type in ‘docker ps -a’.
For example, as we see in the attached snippet, image: SDLC is not running and it is Exited.
We can bring the service up, by either running the above script ‘sdlcservicemanagement.sh’ or with the command ‘docker start container_ID’.
So, in this case, it will be docker start 3a36e9a721ea
We can now open the following URL in Google Chrome to ensure Gathr is accessible: https://machine-ip:18080/klera or https://FQDN:18080/klera

What does Approve user and Enable user means?
With Approve user option, Admin enables a user to login into Gathr. Enable user: Admin can enable an existing user as an Admin / App User / Author / Reader on Gathr.
Are there any limits per account, on number of :
- processes that can be automated.
- templates that can be downloaded, utilized and shared?
Gathr has no limit on the number of processes to automate and templates that can be downloaded, utilized, and shared. Users can utilize and share any number of templates with other users.
How much data does Gathr allow to be stored per account? Is there any limit basis some criteria?
Gathr doesn’t impose data limits on storage per account. However, limit on storage depends on the machine configuration on which Gathr is deployed.
Why is it failing to download, Although Store Items are visible?
If download resource from Store is failing, then please check if you have configured the proxy server correctly.
This can be configured through Administration -> Configure -> Resource Repository
How do I validate if Resource Repository / Gathr Store is successfully reachable from Gathr machine?
Please perform below steps to verify if Resource Repository / Store is reachable from Gathr machine.
Gathr Windows Deployment:
Open Chrome browser from the Windows machine where Gathr is installed.
- Accessibility:
https://resourcerepository.klera.io:18083/klera/repository/test
If the machine is accessible, it will Return “Test”
- Download:
https://resourcerepository.klera.io:18083/klera/resourcedownload/file?fileName=cc4680d6-20f8-431e-a741-2fa5496a4345%5C4abb3d9b-3b1d-457a-bd94-aa4d9f0eab55%5Cassets/bgimages%2F-598752245.jpg
If we are able to download JPG image, means we can download resources from Store to Gathr.
Gathr Linux Deployment:
- Accessibility: Run the following command on Terminal
curl -k https://resourcerepository.klera.io:18083/klera/repository/test
If the machine is accessible, it will Return “Test”
- Download:
curl -k -o sample.jpg https://resourcerepository.klera.io:18083/klera/resourcedownload/file?fileName=cc4680d6-20f8-431e-a741-2fa5496a4345%5C4abb3d9b-3b1d-457a-bd94-aa4d9f0eab55%5Cassets/bgimages%2F-598752245.jpg
Image will be downloaded named sample.jpg
To validate the same, type ls -lhrt
We can conclude that resources can be downloaded from Store to Gathr.
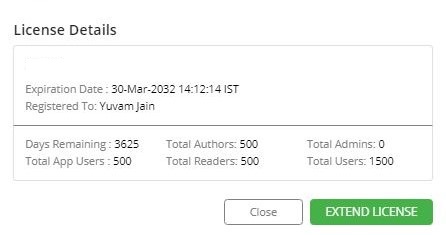
How can I extend my current license?
To extend your current Gathr license, Admin can reach out to Gathr Support at support@klera.io. Gathr team will provide you with an extended license.
Now, click on the Help icon ‘ ? ’ on the top right corner of Gathr Home and click License. You will get the below pop-up, click on ‘Extend License’ and paste the license key provided by Gathr support team and Submit.
How can I download logs from Gathr UI to report to Gathr support?
To download logs from Gathr UI, Right-click on Gathr floor -> Administration -> Product Logs -> Download Logs. It will start downloading the logs.

What are the things to be taken care in OAuth 2.0 Authentication?
Yes, Gathr does support OAuth 2.0 Authentication. Google sheets connector, Salesforce connector are the examples of the same:-
To configure it, user requires:-
- Callback URL
- Auth URL
- Access Token URL
- Client Id
- Client Secret
- Scope
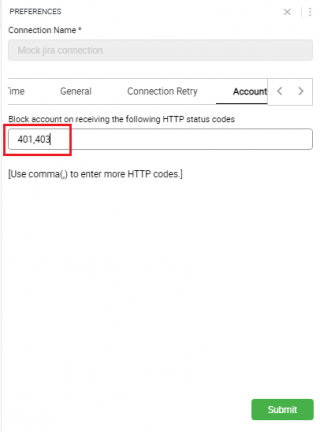
How to update HTTP status codes configuration to disable account blocking on Gathr UI?
User can configure HTTP status codes to disable account blocking on Gathr.
- Right-click on Gathr floor > Connectors > Show. Drag the view on floor.
- Select the required connector > Connectors > Connections > Show. Drag the view on floor.
- Right-click on Connection Name > Connectors > Connections > Preferences. It will open attached form.
In the Account tab, remove the HTTP status code(s) for which you don’t want to block account on Gathr. Now, go to ‘Date time’ tab, under label name ‘Last’ update any numerical number, and click submit.
Next Step upgrade the instance.
- Right-click on Floor > Connectors > Show. Drag and Drop the view on the floor.
- Select the Application > Right-click > Connectors > Instance > Upgrade existing Instance(s).
- It will open a pop-up form, please select the instance(s) and click on Upgrade.
- It will upgrade the selected instance(s) of the connector.
What is the standard license provided by Gathr?
Standard trial license provided by Gathr is of 3 Authors, 2 App Users, 2 Readers for 15 days.
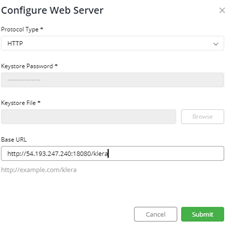
What is Base URL in Gathr?
Base URL is provided to configure the Gathr URL which users are accessing. This is being utilized in the schedule exploration execution.
To configure: Right-click on Floor > Administration > Webserver.
You will get a form. Please refer the below snapshot.
Consider, user is accessing Gathr from https://klera.production.com:18080/klera/login
Fill in the below details,
- Protocol type: HTTPS. It will be HTTP if you are accessing Gathr without SSL
- Base URL: https://klera.production.com:18080/klera
- Keystore file and password
- Click on Submit.
Please see, Keystore file is not required when you are accessing Gathr on HTTP
We must restart Gathr PE core service to reflect the changes. Login to server where Gathr is installed.
Windows: Please go to services, and restart Gathr PE core service.
Linux: Login with root user. Execute the below commands:
docker stop klerapecore
docker start klerapecore
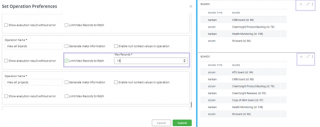
How to limit the number of records to be fetched by an operation?
Please do Right-click on Floor > Connector > User Preference > Operation > Preference.
You will get a new form, select the instance from the drop-down menu. Based, on the instance selection, its operations are listed.
Consider, user has selected the JIRA instance and we want to limit the number of records fetched with the Board operation.
Please refer the below snapshot. Check mark ‘Limit Max records to fetch’, provide the value and hit submit.
Now, when user executes Boards operation, it is now limiting to fetch 15 records instead of 71.
What all different Licensing activation Gathr supports?
Gathr supports two types of License activation- Standard License and MAC-based license.
- Standard License:
- Gathr support provides license key over the mail.
- User needs to download this key on the system where Gathr is installed.
- open the following URL in the web browser (Google Chrome recommended): http://:18080/klera
- After opening the URL, you will see a screen with the message “Welcome, please enter the product key for activation”. On this screen, click on “Activate License Key”.
- Enter the Product Key sent to you and click on Submit (Active internet connection required). This will successfully activate Gathr.
- After successful activation, the login screen will appear.
- MAC-based License:
- If internet connection is not available on the host system, then customer needs to provide MAC address of Gathr server to Gathr support.
- Gathr support creates MAC-based license and shares over email.
- User can follow steps 3-5 as mentioned above to activate the license.
What is difference between Script register and Import?
Consider a simple Python Script to add 2 numbers.
When a user registers a script, they can define the name, description, and level hierarchy for the script operation to be visible. Click on browse and chose the file with python extension (*.py) Click on submit.
You will get a new input pop up form, select the fields as desire, and click on submit. This process is used by an Author while creating a script from scratch and register it on Gathr.
Now, we have register the script for adding 2 numbers. We want to share this script with some other user or Gathr system.
One doesn’t have to re-register rather than import it, and this can be readily used by other user’s for their task.
Author of the script must do right-click on Gathr floor > Scripts > Show. You will get a new View, please bring it on Gathr floor.
Select the Operation (script) name > Scripts > Export. You get the zip file that can be shared with other users or Gathr system.
For user on the receiving end, do right-click on floor > Scripts > import > Browse and select the zip file. Click on Submit.
Script will get imported, and user can execute the operation directly.
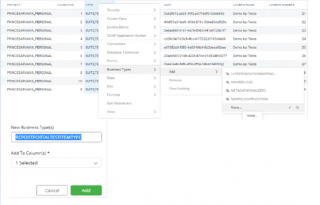
How to add business type to the columns?
Each column of a DST has a property that defines what type of data (Number, Text, Date etc.) can be stored in the column. This is called the ‘Basic Type’ of the column. Gathr user can assign an additional Business Type (BST) to a column. The BST of a column defines the business meaning of the column.
Gathr understands that though the columns are different, yet their business meaning is the same.
For example, “Assignee” and “Reporter” columns in “Issues” dataset, are different columns but can have a common business type to indicate that both are Jira User Ids
- Select the column, Right click > Business Types > Add > More.
- Type-in the New Business type(s), consider ‘REPORTPORTALTESTITEMTYPE’ and click on Add.
- User will get one more pop-up to confirm the changes, click on ‘Yes’.
How to view imported CSV?
- Right-click on the Floor > select Import > View Uploaded CSVs.
The above operation generates a view in the View Panel, double click to bring it on the Floor. This dataset displays information about all the uploaded CSV files such as filename, label, upload time, etc
When user right-click on any row of this dataset, you get the following menu options. a. Delete CSV. b. View CSV
Select the View CSV, user will get a view in the view panel. Double click on the generated dataset in the View Panel to bring it on the Floor.
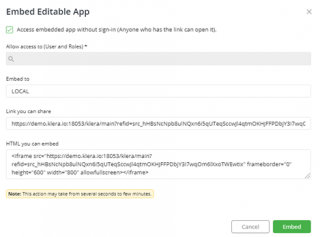
How to Publish dashboard to another system as an embedded object?
Publishing option lets you share your Editable App with Gathr and non-Gathr users. It creates a snapshot of the Editable App that can be readily used to share insights with other users, in a read-only mode.
Publishing option provides you with a shareable link and an HTML code snippet (iFrame tag) is generated which can be placed in your website.
The HTML can be embedded in any portal like Confluence, or a website. Use the URL to open the Exploration in any web browser.
In the Embedded editable app, you can perform various activities like page navigation, view full-screen charts etc. To perform other actions like highlighting, filtering etc., you need to log into Gathr and access the Editable App.
- Go to File Menu > Embed> Local.
You can publish either to local or remote Instance. You can ‘check mark’ to allow user to access without sign in.
If you uncheck it, kindly enter the user and roles you want it to be accessed.
LDAP group information in User list is coming NULL.
Please check if LDAP groups are present in the configured group DN on the LDAP server.
Once the LDAP group is configured in group DN on LDAP server, you will get values in the LDAP group column of ‘Users’ operation.
How to start using Gathr post installation is completed successfully?
As the installation is completed successfully, we must activate the product key.
Download the Product Key sent as an attachment to the email with the subject ‘Klera – Product License Key’.
Open the following URL from Google chrome http://:18080/klera
After opening the URL, you will see a screen with the message “Welcome, please enter the product key for activation”. On this screen, click on “Activate License”.
Open the license file, copy its content, and paste the Product Key. Click on ‘Submit’. After successful activation, the login screen will appear.
Use the default credentials below to login:
- Username: admin
- Password: admin
Sysadmin has approved my user, how to progress further?
Once the User ID is approved by Sysadmin, User can request them to be assigned with necessary roles.
Consider, user want to work on a Use Case of JIRA. User can request Sysadmin to assign appropriate role, that has permissions related to JIRA attributes.
After the role is assigned, post logging in to Gathr, you will find the JIRA’s Instance on the right click.
Execute an operation from the JIRA instance, you will get a pop-up to create a new account. These details prompted are required once to initiate connection.
Fill in the necessary details and click submit.
What is the default persona assigned when user is Sync from LDAP?
The hierarchy of the personas are as follows: –
- Author > App user > Reader.
Author is the highest persona, whereas reader is the lowest.
We have a configuration file in Gathr wherein we defined a default persona of ‘Reader’. As per logic, we compare the lowest persona defined on the license and with configuration file in Gathr.
For example,
- Case1:
While creating a license, we have defined 10 Authors, 10 App users, 10 Reader. Reader is the lowest persona defined on license, and it is compared with configuration.
Reader (license) – compared – Reader (configuration). So, highest persona among these 2 is ‘Reader’ itself. Now, default persona assigned to user while syncing with LDAP is ‘Reader’.
- Case2:
While creating a license, we have defined 10 Authors, 10 App users, 0 Reader. App users is the lowest persona defined on license, and it is compared with configuration.
App users (license) – compared – Reader (configuration). So, highest persona among these 2 is ‘App users’. Now, default persona assigned to user while syncing with LDAP is ‘App users’.
If I remove/ add users to the LDAP user group, when will they reflect on Gathr?
If you add the user in LDAP group, and the same group is configured on Gathr. Users will be added in the next sync cycle. Gathr syncs with LDAP every 60 mins.
You can also sync it manually at the same moment. Right-click on Floor > Administration > User and Groups > Sync LDAP user
If you remove the users from LDAP, they will not be deleted on Gathr.
If I remove a group from LDAP, will it be removed from Gathr too?
If you add a group on the LDAP, and the same group is configured on Gathr. It will be added to Gathr.
If you remove the group from LDAP, the group and its users are not deleted from Gathr.
Why do I need to create a separate LDAP User Group for Gathr? Why should we not sync all User Account?
We highly recommend creating a new LDAP user group for Gathr.
Gathr can sync Users account from LDAP, but if we do not segregate, we will also get those users that may not be using Gathr.
For example, if the business requires 250 users working on Gathr and company have 1000 users, we will sync extra 750 users which are not necessary.
So, we can create a separate LDAP group and add users to it. Then, we can configure the LDAP on Gathr and sync only required users.
How often does the LDAP-Gathr sync?
LDAP syncs every 60 mins on Gathr.
How can a User login to Gathr if he leaves the organization, and rejoins with same email address but different user ID?
Consider, user: John Doe with email address: john.doe@company.com and his user id: ‘johndoe’, he can login to Gathr either with his Email or User ID.
Now, if John Doe leaves the organization and rejoins the company with same email address and different user ID, let us consider new user ID: ‘jdoe’.
Scenario A: If SYSADMIN has not disabled the old account, and now both users are active.
Case 1: If logging in with his ‘email address’ he won’t be able to login.
Case 2: Logging in to Gathr with user ID. If User logs in with old user id ‘johndoe’ he can continue with his work where he left off.
Case 3: If user logs in with new user id ‘jdoe’ he will get a fresh new Gathr home.
Scenario B: If SYSADMIN has disabled John Doe’s old account, he can login with his email address.
How to disable a user when he leaves the organization?
Yes, you can disable a user.
- Right click on Floor > Administration > User and Group > View Users.
- You will get a View, please Click and Drag View on the floor.
- Select the user ID > Right click > User > Disable user.
How can I still use Gathr if my LDAP goes down?
Gathr sync’s the users from the LDAP group that you are configured on, but we do not store the password.
If LDAP goes down, users will not be able to authenticate themselves on Gathr. Hence, they cannot login on to Gathr.
I have both LDAP and SAML(OKTA) in my enterprise. Any recommendations which one to use?
Gathr support both LDAP and SAML with OKTA integration. Each of the Single Sign-on serves their own purpose.
SAML provides cross domain authentication mechanism. Consider you have login to some another application after authentication oneself with SAML, Users can now login to Gathr without providing their credentials.
LDAP with(out) SSL: User must provide their credentials to login on Gathr.
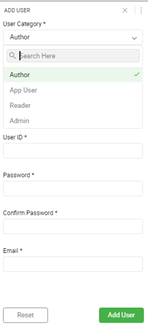
What is the default persona for a new user?
You can create a basic user with Right-click on Floor > Administration > Users and Group > New User.
You will get a form as we see in below snippet. Select the category and chose the persona for the user you want to check.
Also, if user created an account on Gathr with sign-up flow, sysadmin would get an email with the below options:-
- To verify and approve the user.
- To verify and approve the user as Author.
- To verify and approve the user as Admin.
- Reject the request of user creation.
Where can I find my License details for number of user available and consumed?
We provision 2 types of licenses:
Persona Based: Right-click on Floor > Administration > License > View License details
CPU Based: Right-click on Floor > Administration > License > View CPU consumption details
Also, you can click on Gathr store and select Gathr Administration solution. You can download App the following apps to get additional insights.
- Persona based: Gathr User Based License Utilization Analysis
- CPU based: Gathr CPU Based License Utilization Analysis
Should Connector’s downloads be administered by the Sysadmin (Admin) User?
Yes, we highly recommend connector download should be administered by a sysadmin user.
To disable download access of connector/resources from Gathr App Store is Permission driven.
Select the Role Name you have assigned to the users.
- Role name > Right Click > Role > Assign Permissions.
- Search for App store, and kindly uncheck App Store > App Install. Click on update.
If a user with Reader persona and I assign him Sysadmin role, will he get SYSADMIN permissions?
No, persona is the apex. Even though you assign SYSADMIN role, user will continue to be a reader.
To be system admin, user should be of author persona, and it should be assigned a role of SYSADMIN.
How to add-remove Permission of a role?
Right click on Exploration Floor > Administration > Roles and Permission > View Roles.
Once view is available in the panel, please click and bring it on the floor.
Select the Role Name > Right Click > Role > Assign permissions.
What is the elementary flow for RBAC?
To understand in the simplest way.
- Role – A group of Permissions
- Permission – All the options (permissions) which are available to a user either on Right-Click or in the different Menu Options.
You create a role and assign set of permissions to it. Doing so, you can then assign the role to users or set of users.
How to import a connector and create instance in New UI?
With Gathr New UI we have improved the usability and simplify the workflow to work with connectors and instances. This can now be done from Gathr Home itself.
Go to the Data Source tab, click on upload icon to import a new connector. Consider user has uploaded JIRA connector. After it is imported successfully, we can now create an instance.
Select JIRA connector. Click on the 3 dots menu and select create Instance. Type in the instance name and hit submit. You will get a new page to configure it, fill in the necessary details.
We have also provided a new feature to ‘Test Connection’ to validate the connection.
If the connection is successful, it will return HTTP status code: 200, and returns a JSON response, Vis-à-vis, if a connection is unsuccessful it will return ‘connection refused’.
Click on Save to complete the configuration.
Note: Test API should be implemented in the connector for Test connection functionality to work.
How to Edit Account of any Application Connector on new UI?
You can edit the account for any Connector with any of the below methods.
Method 1:
- Click on the Accounts tab on Gathr Home.
- Click on the three-dot menu of Account that you want to edit and select Edit.
- A form will pop up to update account, please enter the password and click Submit.
- Another form will pop-up, select Instance(s) for which account needs to be updated, and click Submit.
Method 2:
- Open an Exploration.
- Click on Accounts -> Edit menu on the top.
- A form will pop up, select Account that you want to Edit.
- It will open another form, please enter Password and click Submit.
- Another form will pop-up, select Instance(s) from the dropdown for which account needs to be updated, and click Submit.
How can I disable access to download for specific Users/Roles for Gathr Store?
To disable download access of resources from Gathr App Store, it is driven by permissions.
Select the Role Name you have assigned to the Users.
Role name > Right Click > Role > Assign Permissions.
Search for App store, and kindly uncheck App Store > App Install. Click on update.
Can I suspend a user?
Yes, you can suspend a user.
- Right click on Floor > Administration > User and Group > View Users.
Once view is available in the panel, please click and bring it on the floor.
- Select the User ID > Right click > User > Disable User.
How can I change the persona of a user?
- Right click on Floor > Administration > User and Group > View Users.
Once view is available in the panel, please click and bring it on the floor.
Select the User ID > Right click > User > Enable User as Admin / App User / Author / Reader
Does default user “admin” consumes a user license?
No, the default User “admin” does not consume a license.
How can I assign a role to a user or set of users?
Right click on Exploration Floor > Administration > Roles and Permission > View Roles.
Once view is available in the panel, please click and bring it on the floor.
Select the Role Name > Right Click > Role > Assign to Users.
Select user or set of users required to Assign Role. Click on update.
Can I edit the permissions of SYSADMIN Role?
No, you can’t edit the permission of SYSADMIN role.
When you assign this role, user becomes system administrator with all permissions to Gathr.
Do other User’s need to Configure their Accounts with my shared Instance?
Consider, user A has shared an account with user B. Then, user ‘B’ does not have to configure the account for the instance.
- User A: Please click on Accounts tab from Gathr Home. Select the account, click on 3 dots menu, and click on share. You can share the account with users and roles. Type in the necessary details and click on submit.
User B can click on bell icon for notification and check the details. Now, user B can execute the operations.
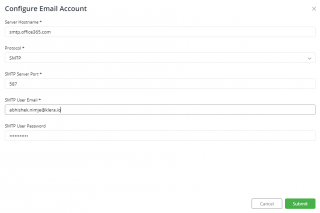
How to configure SMTP mail server on Gathr?
Users can configure the SMTP mail server on Gathr with the below steps.
- Right-click on Gathr Floor.
- Select Administration -> Configure -> Email account.
- You will get a pop-up to fill in the necessary details. Please refer the attachment.
- On completion, click on Submit.
How to create a user on New UI of Gathr?
- Step 1:
A new user can create an account by clicking on Sign up now option on Gathr login page. You will get a new Page, wherein you are asked to enter your work email address. An email will be sent for Gathr token verification. Check your mailbox and enter the token to verify it.
- Step 2:
SYSADMIN will get an email for user verification and approval. It has 3 options: –
- Verify and approve the user.
- Verify and approve the user as Author.
- Reject the request.
Now, SYSADMIN selects “Verify and approve the user as Author”. Gathr can have more than 1 users who can have the SYSADMIN role. Consider SYSADMIN user ‘A’ has approved the request, an email will be sent all user with SYSADMIN role informing about account creation status.
- Step 3:
On approval,
User will get an email to create a new password for its Gathr account, click on the URL it will redirect to Gathr Home page to complete the sign-up process.
Does Gathr have a possibility of White-labelling?
Yes, Gathr can be available as a white-labelled product.
Do you provide Single Sign-On with Gathr?
Yes, Gathr provides integrations to Active Directory, LDAP, SAML through which automatic sign-ins are possible.
What kind of User Permissions & Personas does Gathr have?
Gathr has its own set personas and related permissions which the admin needs to assign to each and every user. The permissions given by the admin defines what a user can do on Gathr.
There are 3 Personas on Gathr:
- Authors – They have the rights to design the apps/ explorations on Gathr.
- Application Users – These are the users who use the Gathr application in their process & with their Data.
- Readers – These are set of people who view and analyze the outcomes/ reports.
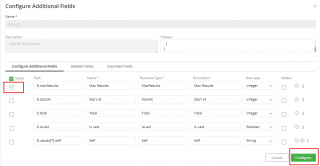
How to configure Custom Fields for an instance in new Gathr UI?
You can configure Custom Fields Manually/Auto with the below steps. Auto-configure Custom Fields- 1. Right-click on Floor>Connectors>User Preference>Instance>Auto-configure Preferences 2. It will open a pop-up window, select the Instance for which you want to enable the automatic addition of custom fields. This will enable all fields coming in the JSON response.
- Manually configure custom fields:-
Right-click on floor Connectors>User Preference>Instance>Configure Custom Fields 2. Select the Instance and Operation you want to configure and click next.
Provide input value for the parameter(s) and click next.
You will get a form, please select custom fields to be added and click configure. The columns that are visible and selected in the form only those will be present when you re-execute the data set.
How to download Logs and Operation History from Gathr UI?
Please find the below steps to get Product Logs.
- Right click on Gathr floor
- Go to Administrator –> Product Logs –> Download
- Product Logs will be downloaded in the browser.
Please find the below steps to get Operation History from Gathr UI.
- Right click on Gathr floor
- Go to Administrator –> Operation –> History
- New wizard will open. Select the Time Duration, User, Editable Apps, Apps.
- Click on ‘Submit’
- In the view Panel, the Operation History data set will raise. Please drag and drop it on the Gathr floor
How to Add a new User on Gathr?
To add a new User on Gathr:
Open a new exploration
Right Click on the Gathr floor
Click on Administration > User & Group > New User
A new form will pop up, fill in the details of the new User
Once a user is created, we need to assign Roles and Permissions.
What do we understand by Roles and Permissions on Gathr?
The simplest way to understand Roles and Permissions on Gathr are as follows: Permission – All the options (permissions) which are visible to a user are available either on Right-Click or in the different Menu Options.
- Role – A group of Permissions
So, instead of assigning multiple permissions to different Gathr Users, we can assign a particular Role to all the Users.
How to assign Roles and Permissions on Gathr?
A User needs a Role to be assigned or created for him to have Permissions within that Role. Hence, we create a new Role and club Permissions for the user or check the permissions of an existing role and assign an appropriate Role to the user.Let’s see how it is done on Gathr:
- Create a Role – Go to Administration > Role & Permission > New Role (This will open a simple form where a New Role and its Description can be created)
Check existing Role Permissions – Go to Administration > Role & Permission > View Role Permissions (This will result in a dataset where one can check all the permissions for different Roles)
See all the Permissions Available on your Gathr – Go to Administration > Role & Permission > View Permissions (Check and note all the permissions which you wanted to be assigned to the Role(s))
Assign Permissions to a Role – Go to Administration > Role & Permission > View Roles (This will open a dataset with all the Roles listed). Select the Role from the Column “Role Name” > Role > Assign Permissions (Select the specific Permission(s))
Assign a Role to User – Go to Administration > User & Group > View Users (This will result in a dataset with details of all the Users), Select the User from the Column ”User ID” > Right Click > User > Assign Roles (Select the specific Role(s))
How to manage users on Gathr?
To manage Users follow the below steps:
- Right Click on Gathr floor and click on Administration
- Select User & Group and click View Users (You will get a Dataset with all the Users)
- Select the User, Right Click
- You will get a number of options related to User Management – Assign/Edit/Delete/Enable/Reset Password
- Select the desired option.
For Roles & Permissions:
- Right Click on Gathr floor and click on Administration
- Select User & Group and click View User Roles (You will get a Dataset User Roles)
- Right click on Gathr floor, click on Administration, move to Role & Permissions and Select View
Role Permission to see what permissions are currently assigned to various Roles.
- To edit/add any permission(s), Right Click on Gathr floor, click on Administration, move to Role & Permissions & Select View Roles to get the list of Roles.
- Right Click on the desired “Role Name” and select Role from the following options- Assign Permissions/Assign Users/Delete/Edit Role.
How to manage RBAC (Role Based Access Control) on Gathr?
RBAC refers to Roles & Permissions on Gathr.
Roles – A particular role or set of roles can be assigned to a user or group of users. For each role, there are several permissions that can be assigned as required. The role is defined by these permissions.
Permissions – These are the options/operations which is visible under any context menu on right-click, or under different headers like Menu/Help/Template etc. Moreover, permissions are actions that you can perform from the container level menu/data set menu/history menu. For Example, To be able to re-execute an Exploration is a permission, and if you don’t allocate this permission, these options will be hidden on Gathr for other users.
How to configure LDAP (Lightweight Directory Access Protocol) on Gathr?
To configure LDAP (Lightweight Directory Access Protocol) on Gathr please follow the appropriate link for Windows/Linux systems.
Pre-Configuration: Before initiating the configuration process, your LDAP administrator must complete the following two steps:
Step 1: Create Gathr User Group
- Create a User Group in Active Directory Server (ADS).
- Add users to this group for providing access to Gathr.
Step 2: Gather the following LDAP attribute details
- Server Host Name: ADS hostname or IP address (e.g. org.com).
- Directory Server Type: Type of LDAP directory to be connected. (E.g. Microsoft Active Directory, OpenDS or Custom)
- Security Mode: ADS Security Protocol (e.g. SSL or non-SSL).
Note: If ADS is hosted on SSL, then ADS admin needs to provide a Trusted Certificate. This certificate will be installed on Gathr server.
Refer the Readme.txt file available at “\Klera\Klera\Tools\InstallADSCertificateToKlera”, for example: C:\Program Files\Klera\Klera\Tools\InstallADSCertificateToKlera
- Server Port: Port number of the ADS.
- Base DN: Base DN for searching the users in ADS. (E.g. DC=org,DC=com)
- User DN: Distinguished Name of a user who has permission to search (read-only) in the LDAP directory. (E.g. CN=Test User,OU=KleraUsers,DC=org,DC=com)
- Password: Password of the user with search permissions.
- Additional User DN: This value is used in addition to the base DN when searching and loading users. If no value is supplied, the subtree search will start from the base DN. (E.g. ou=Users,DC=com)
- Additional Group DN: This value is used in addition to the base DN when searching and loading groups. If no value is supplied, groups will not get synced.
Note: If no value is supplied for Additional User DN or Additional Group DN, the subtree search will start from the base DN. In case of huge directory structure, this could cause performance issues while syncing users and groups.
LDAP Server Schema (User and group schema)
- Directory Server Name: LDAP server name.
- User Object Class: Class name used for the LDAP user object. (E.g. user)
- User Object Filter: Filter defines the part of the LDAP tree from which users will get synced. A filter should be created with both user and group memberships. (E.g. If your LDAP Administrator created a user group for Gathr as “KleraUG”, your filter will be: memberof=CN=KleraUG,OU=OnMail,DC=org,DC=com.
Here, the filter will fetch all users in “KleraUG” user group in Active Directory Server).
User Name Attribute: The attribute field to be used while loading the username. E.g.
cns
AMAccountName
User First Name Attribute: The attribute field to be used while loading the user’s first name. (E.g. givenName)
User Last Name Attribute: The attribute field to be used while loading the user’s last name. (E.g. sn)
User Email Attribute: The attribute field to be used while loading the user’s email address. E.g. mail
Group Object Class: The class name used for the LDAP group object. (E.g. groupOfUniqueNames)
Group Object Filter: Group Object filters are used to control the groups that will be imported on Gathr from ADS. (E.g. OU=OnMail,DC=org,DC=com)
Above filter will import all the groups that come under Organization “OnMail”.
Group Name Attribute: The class name used for the LDAP group object. E.g.
groupOfUniqueNames
group
Group Members Attribute: The attribute field to be used while loading the groupmembers. (E.g. member)
Does Gathr support SAML (Security Assertion Markup Language)?
Yes, Gathr can connect with SAML (Security Assertion Markup Language) based system for user login and SSO (Single Sign-On) from version 4.1.52.0 and above.
How to manage work and data of an employee who has left the organization?
Admin cannot impersonate a user account. However, an admin can reset the password and enable the supervisor in gaining access to the account.
Moreover, as a cautionary measure to ensure that work does not get lost follow the below steps:
Ask User to create Templates and share those with other users. Keep the important Explorations created by Users shared with other users.
How to manage work and data of an employee who has left the organization?
Admin cannot impersonate a user account. However, an admin can reset the password and enable the supervisor in gaining access to the account. Moreover, as a cautionary measure to ensure that work does not get lost follow the below steps:
- Ask User to create Templates and share those with other users
- Keep the important Explorations created by Users shared with other users
Where do I find details about my license and its status?
To Find out details about License and it’s Status, please follow the below steps: Click on the Help menu at the top left of Gathr floor and select License to view details.
Is there any marketplace where various Apps, Templates and Connectors are kept for other users to use?
Yes, we have Gathr Store where you can find various Apps, Connectors, Templates and get them on your Gathr instance to use. To access Gathr Store, please click on the Store button present on the top right corner of Gathr home screen.
What is the CPU Consumption based license model of Gathr?
Yes, Gathr does support CPU consumption-based license model. Customers can opt for CPU time as per their organization’s requirements.
How can I ensure there are no undue schedules running from his account?
User with Administrator persona can delete all unnecessary schedules (If any) via template provided by Gathr Team as below:
https://expanse.klera.io/s/TXH74GYH2GyyjZa
The Users need to perform below steps to use this template:
- The Users are required to upload the template on Gathr by clicking the File Menu – > Templates -> Import.
- Once template is imported, right click on Gathr floor and click on Administration-> User & Group -> View Users.
- Bring the template from the View Panel to Gathr floor.
- The users will see two tabs, ignore the second tab for License Utilization
- Use the first tab i.e. Exploration Dashboard.
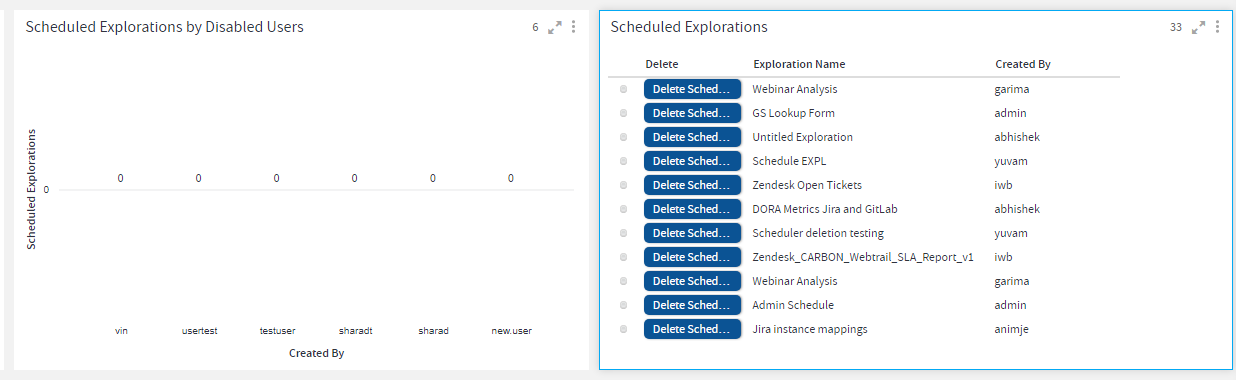
- Container named “Scheduled Explorations by Disabled Users”, where user can see all the scheduled explorations of the Disabled Users.
- Another container named “Scheduled Explorations”.
Here, the administrator can click on the Delete Schedule button and delete all the unnecessary scheduled explorations for the disabled users. Refer below image for more understanding:
If you have any feedback on Gathr documentation, please email us!