User Interface Overview
Gathr Home
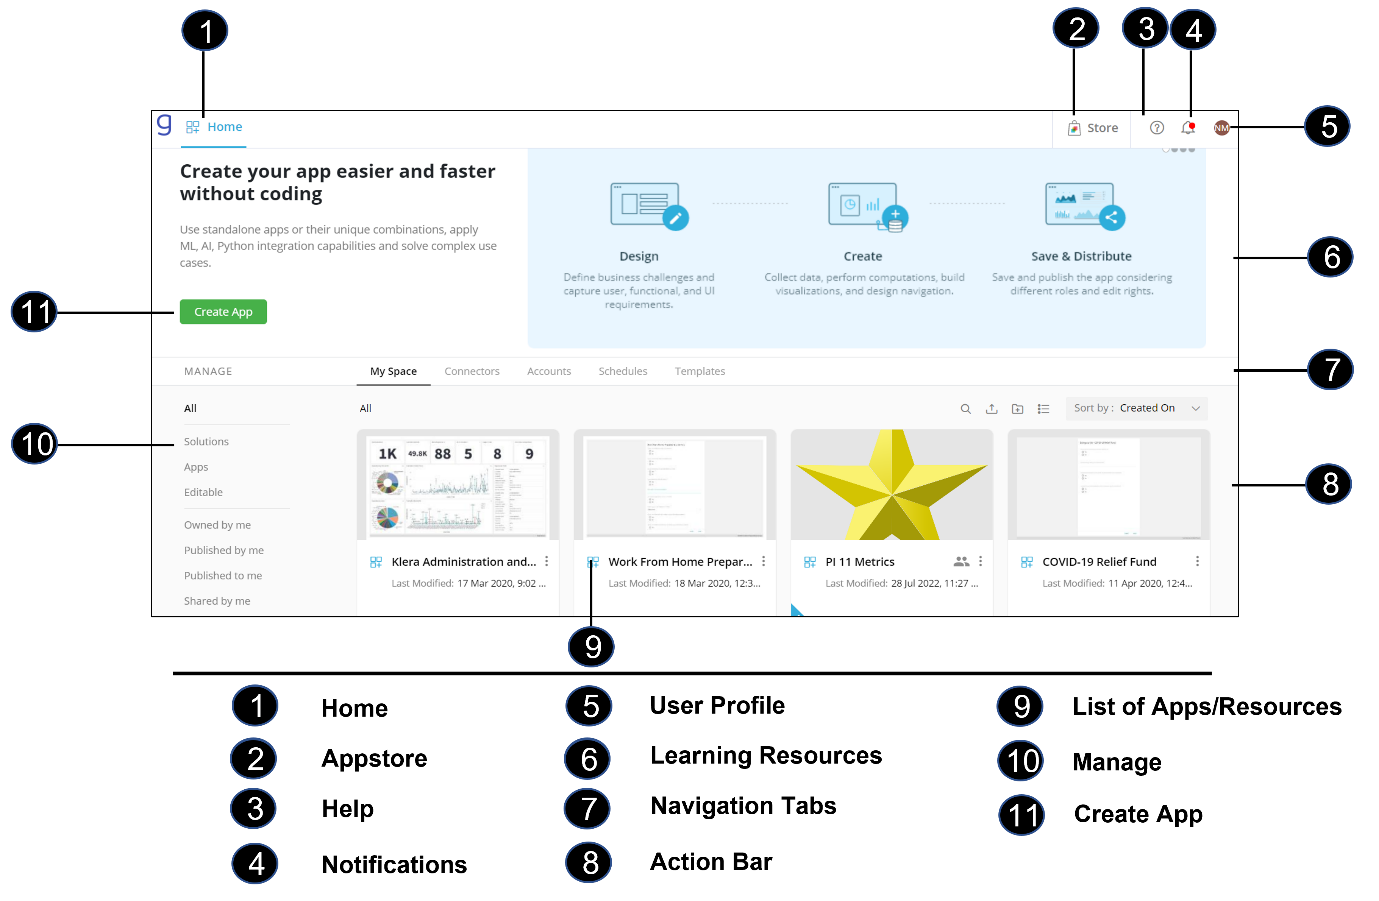
User Interface Elements of Gathr Home
| S No. | User Interface Element | Description |
| 1 | Home | Click on the  icon to open Gathr Home where you can access your Apps, Connectors, Accounts, Schedules, and Templates. icon to open Gathr Home where you can access your Apps, Connectors, Accounts, Schedules, and Templates. |
| 2 | App Store | Click on the  icon to access Gathr App Store. App Store hosts various ready-to-use resources like Apps, Connectors, and Solutions. This is a centralized App Store hosted by Gathr and all the customers connect to the same app store. icon to access Gathr App Store. App Store hosts various ready-to-use resources like Apps, Connectors, and Solutions. This is a centralized App Store hosted by Gathr and all the customers connect to the same app store. |
| 3 | Help | Click on the  icon to know details about the product version and release notes. You can also find product license information here. icon to know details about the product version and release notes. You can also find product license information here. |
| 4 | Notifications | Click on the  icon to see all the notifications. You receive notifications for events like Apps shared with you, Scheduled Run Started or Completed, etc. Uncaught notifications are shown with a number on top of the bell icon. icon to see all the notifications. You receive notifications for events like Apps shared with you, Scheduled Run Started or Completed, etc. Uncaught notifications are shown with a number on top of the bell icon. |
| 5 | User Profile | Click on the  icon to view and edit your profile and log out. icon to view and edit your profile and log out.Note: If you are using an LDAP account to access Gathr then you cannot edit your profile from Gathr. |
| 6 | What is New in Gathr | Watch this space for new App launches, popular Apps, new feature introductions. You can also access quick start guides produced to help you get started with Gathr. |
| 7 | Tabs | Tabs to access various resources and their configurations |
| My Space | Your Apps, Editable Apps (Formerly called Explorations), Folders, and Solutions are available here. | |
| Connectors | Connectors let you connect to your Connectors like Databases, REST Systems, Tools, and Platforms. You can configure these Connectors from here. | |
| Accounts | Accounts are credentials that you can use to authenticate your access to various Connectors using your connectors. Single account can be used to access multiple tools through different connectors. You can configure, validate and associate these Accounts with connectors. | |
| Schedules | Schedules created on Editable Apps are listed here. Schedules make your Editable app run automatically on set schedule. You can edit, disable or run a schedule from here. | |
| Templates | Your Templates are listed here. Templates are reusable recording of the visualization and logic of your app. You can use a template in another editable app to rapidly build the logic encapsulated in the template. | |
| 8 | Action Bar | It gives you quick access to search, sort, toggle view, etc. The options vary for each of the above tab. |
| 9 | Apps/Resources | Resources are shown here as per the selected tab (e.g. Apps are listed in My Space). You can view the resources in the Tile view or List view. Each item has a three dots menu to access possible actions on the resource e.g. Rename, Copy, Configure, etc. |
| 10 | Manage | Use various options to filter the resources listed in the view to find items quickly. e.g. click on ‘Recent’ to find the most recently accessed Apps etc. |
| 11 | Create App | Click to start the app creation flow. |
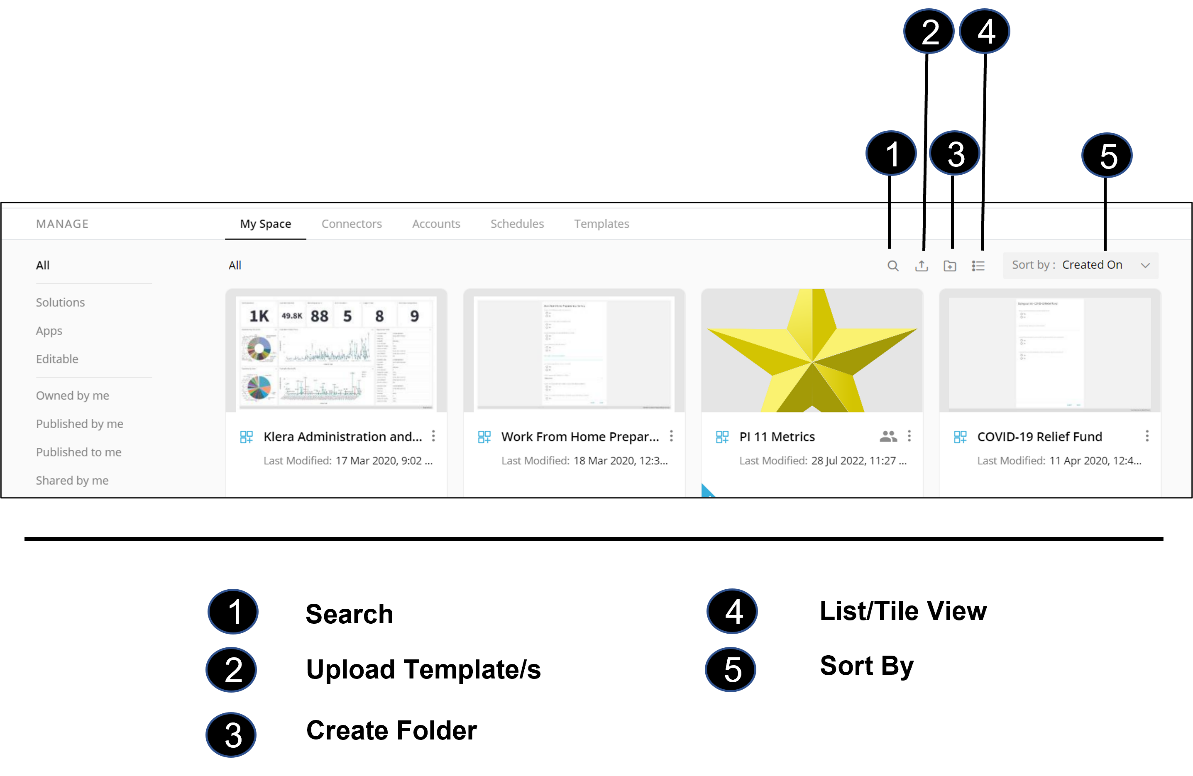
My Space
| User Interface Element | Description | |
| 1 | Search | Click on the  icon and type in the search box. It will search Apps and Folders by name, description, tags, and various other meta properties of apps. icon and type in the search box. It will search Apps and Folders by name, description, tags, and various other meta properties of apps. |
| 2 | Upload | Click on the  icon to upload an App. icon to upload an App. |
| 3 | Create Folder | Click on the  icon to create a folder. You can move/copy your Apps in a folder. icon to create a folder. You can move/copy your Apps in a folder. |
| 4 | List/Tile View | Click on  or or  icon to show ‘My Space’ in the list or tile view. icon to show ‘My Space’ in the list or tile view. |
| 5 | Sort | Select the criteria from the drop-down to change the sort order. You can also choose Ascending or Descending order. |
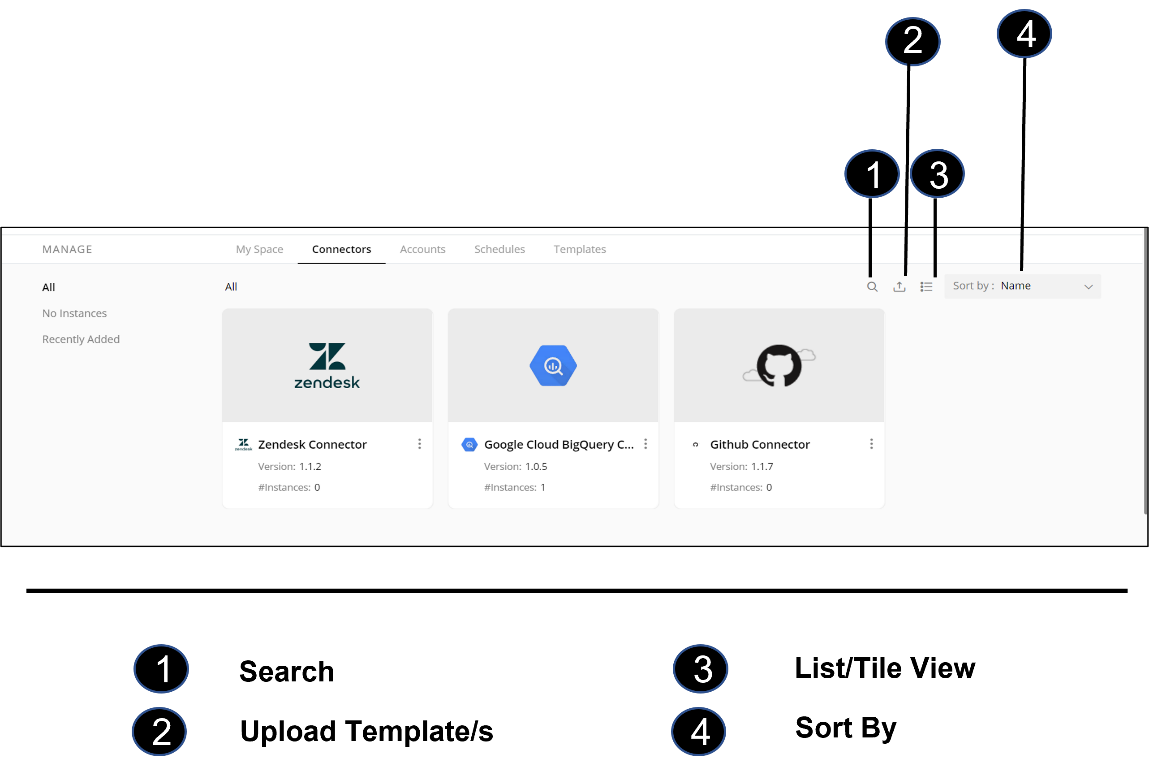
Connectors
| User Interface Element | Description | |
| 1 | Search | Click on the icon and type in the search box. It will search Connectors on name, description, tags, and various other meta properties of Connectors. |
| 2 | Upload | Click on the icon to upload a Connector from your local disk into Gathr. |
| 3 | List/Tile View | Click on or icon to show ‘Connectors’ in the list or tile view. |
| 4 | Sort | Select the criteria from the drop-down to change the sort order. You can also choose Ascending or Descending order. |
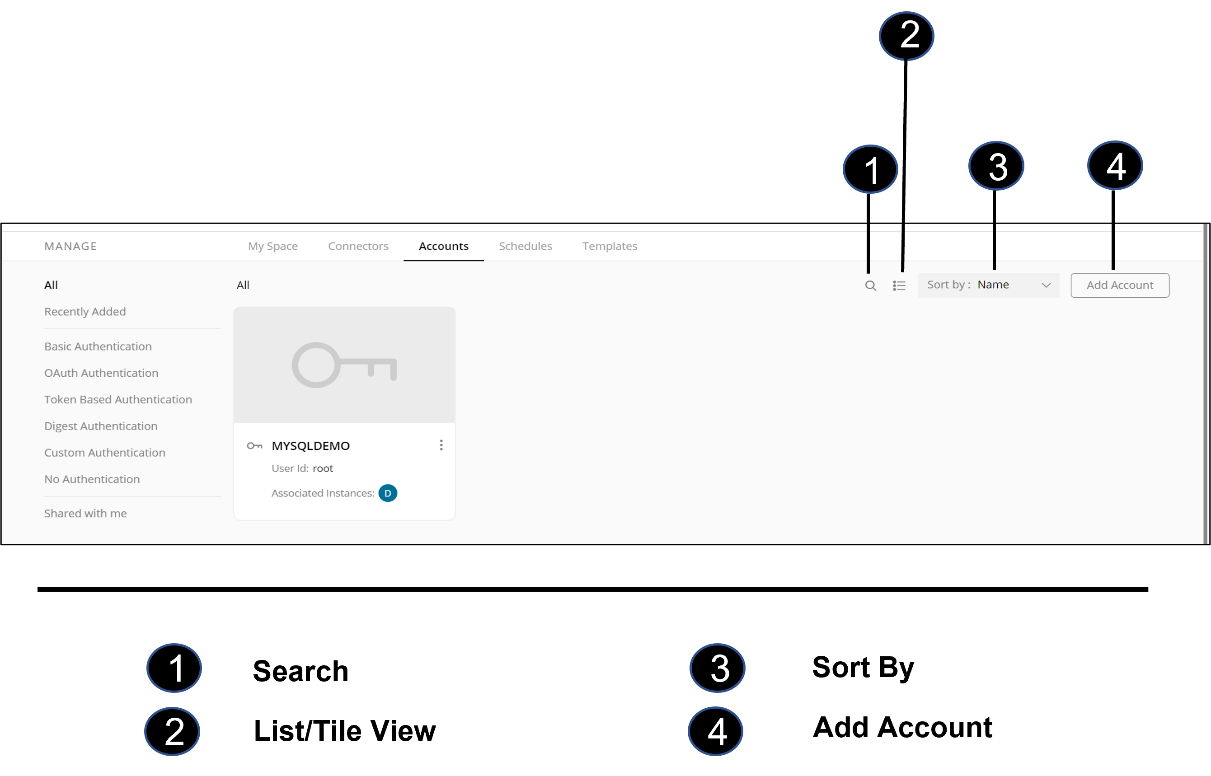
Accounts
| User Interface Element | Description | |
| 1 | Search | Click on the icon and type in the search box to search for Accounts. |
| 2 | List/Tile View | Click on or icon to show ‘Accounts’ in the list or tile view. |
| 3 | Sort By | Select the criteria from the drop-down to change the sort order. You can also choose Ascending or Descending order. |
| 4 | Add Account | Accounts are used for authentication and authorization when you connect to the tools. You can create new accounts for the connections of your connectors from Gathr Home. |
Schedules

| User Interface Element | Description | |
| 1 | Search | Click on the icon and type in the search box to search for Schedules. |
| 2 | List/Tile View | Click on or icon to show the ‘Schedules’ in list or tile view. |
| 3 | Sort By | Select the criteria from the drop-down to change the sort order. You can also choose Ascending or Descending order. |
Templates
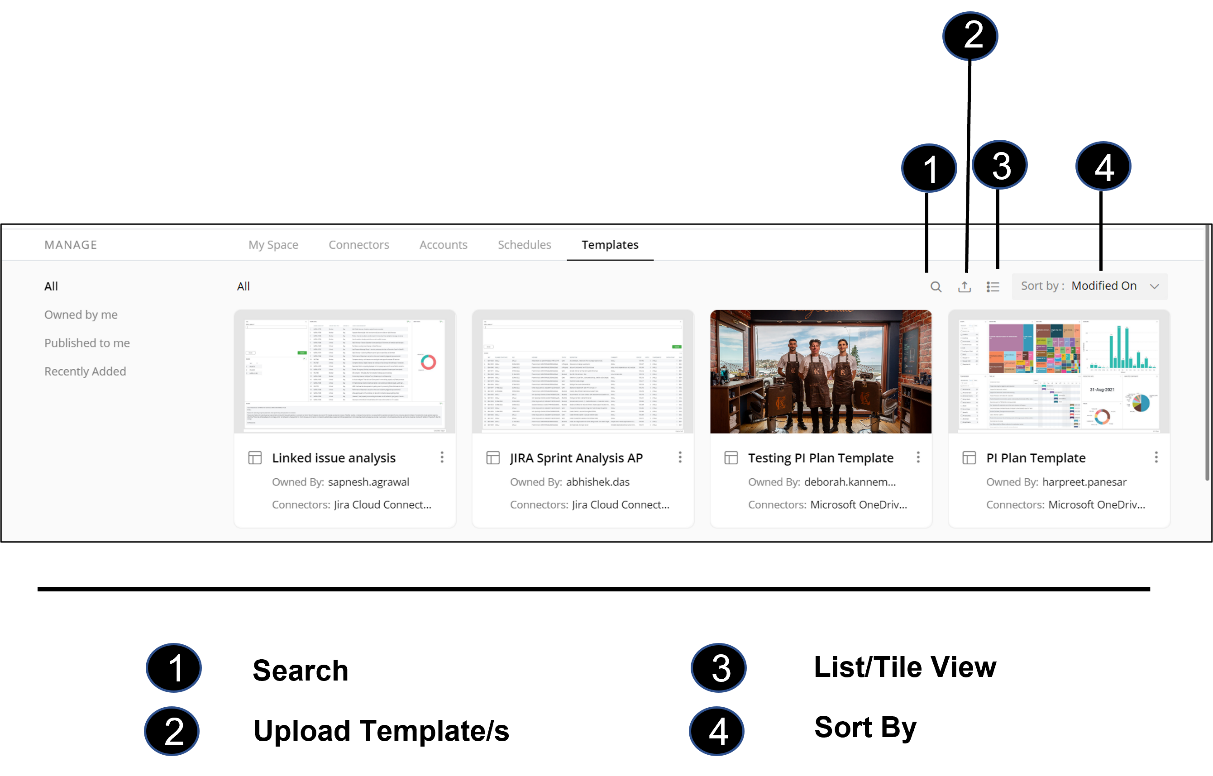
| User Interface Element | Description | |
| 1 | Search | Click on the icon and type in the search box to search for Templates. |
| 2 | Upload Template(s) | Click on the icon to upload Templates from your local disk to Gathr. |
| 3 | List/Tile View | Click on or icon to show ‘Templates’ in the list or tile view. |
| 4 | Sort By | Select the criteria from the drop-down to change the sort order. You can also choose Ascending or Descending order. |
Gathr Editable App
User Interface Elements of Gathr Editable App
Newly Created Editable App
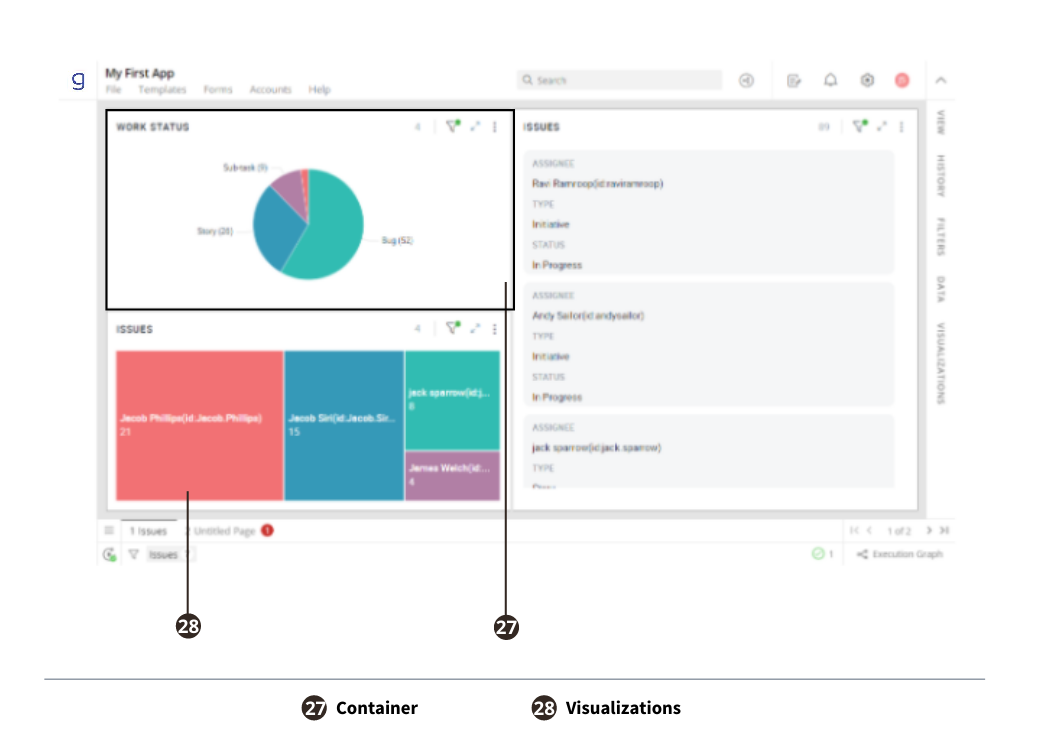
Editable App with Data and Visualizations
| User Interface Element | Description | |
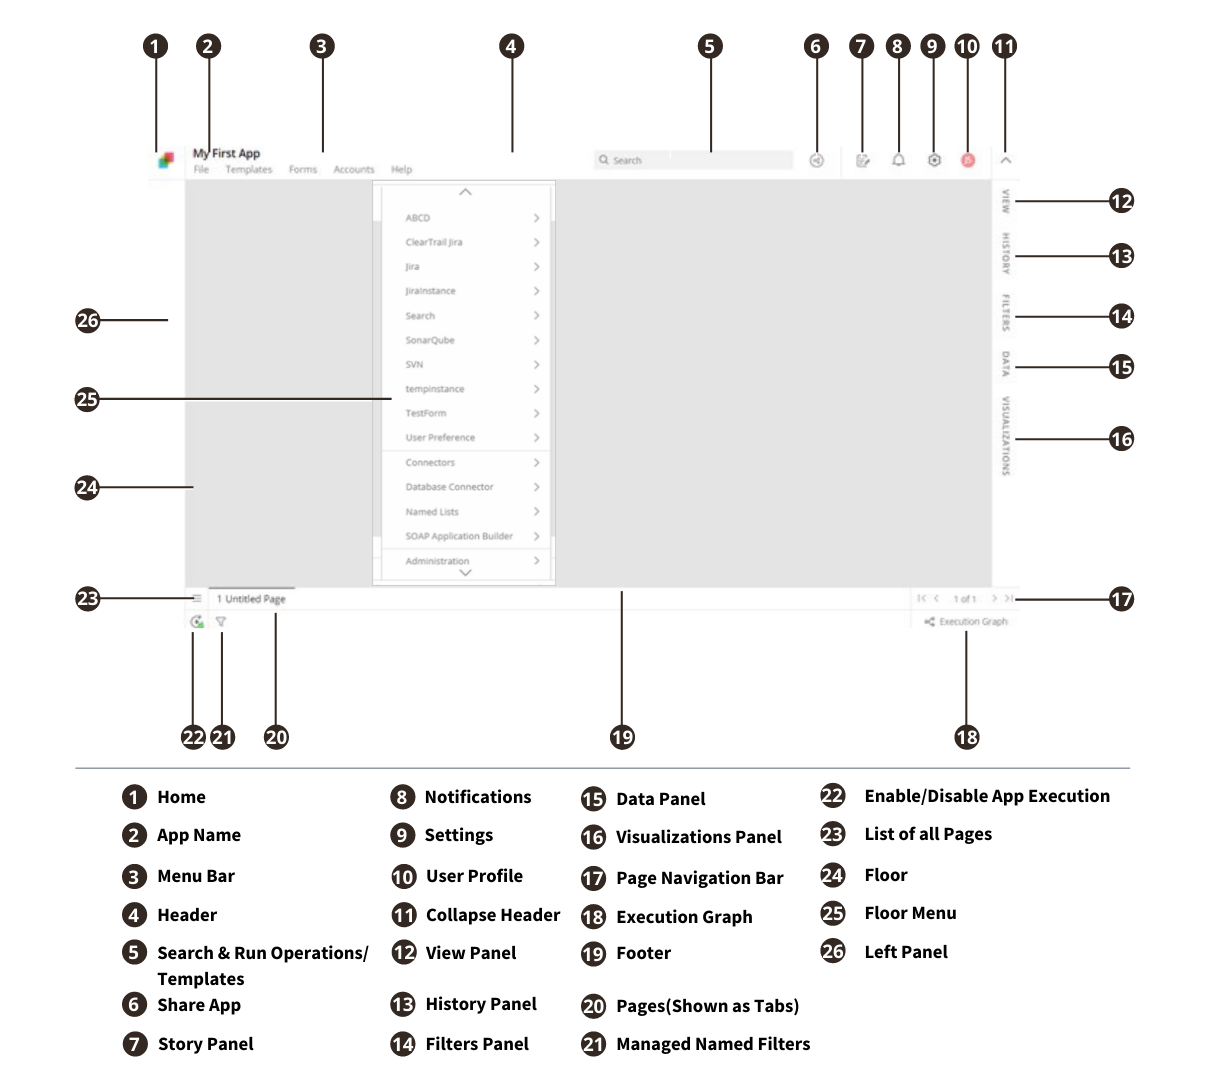
| 1 | Gathr Logo | Click on the  icon to go to Gathr Home. icon to go to Gathr Home. |
| 2 | App Name | This is the name of your current App. You can edit the App name by clicking on it. To learn more about App, refer to section- Starting with your first App. |
| 3 | Menu Bar | The Menu Bar is at the top left side of the Gathr application window. These menu options are explained below |
| a | File | This menu option lets you manage your Apps. You can create New, Open, Rename, Share, Publish, Download As, Re-execute, Schedule and Close the current App. To learn more, refer to section- ‘Starting with your first App’ |
| b | Templates | This menu lets you Create, Rename, Import, and Manage Templates. |
| c | Forms | This menu lets you Create, Edit, and Delete forms. You can create a form either with a form builder or from the CSV or dataset. |
| d | Accounts | This menu option lets you manage accounts used to authenticate access to connectors/Connectors. You can Add, Associate, Delete, Edit, Share and Show Accounts. |
| e | Help | This menu provides details about the product version, and release notes and license. |
| 4 | Header | The top band of the Gathr application window is the header. |
| 5 | Search and Run Operations/Templates (Deprecated Feature) | It helps you search for operations and Templates that are relevant for the data present on the current page and run/execute them. |
| 6 | Share App | To share the current App with other users/roles. To learn more, refer to Section- Share and Collaborate |
| 7 | Story Panel | Click on the icon to open/close the Story Panel. All your Story Points are listed here. You can view and manage (edit, reorder or delete) story points. To learn more, refer to section - Create a Story |
| 8 | Notifications | click on Bell icon to view all the notifications that you have received. Notifications are received for various events like App shared with you, Scheduled Run Started etc. |
| 9 | Settings | Click on the  Icon to change following App-level settings Icon to change following App-level settings* Theme: Light or dark * Background Color of your App * Show/Hide page numbers on the tab |
| 10 | User Profile | Click on the icon to view and edit your profile or log out. Note: If you are using an LDAP account to access Gathr then you cannot edit your profile from Gathr. |
| 11 | Collapse Header | Click on the  and and  to collapse/expand the header. to collapse/expand the header. |
| 12 | View Panel | After you perform an operation that generates data, View Panel slides in from the right and lists the resulting datasets and Templates valid for this data. To learn more, refer to section - Basic Concepts and Terminology |
| 13 | History Panel | Lists of all the operations in the order of execution in the current app. To learn more, refer to section - Basic Concepts and Terminology |
| 14 | Filters Panel | It lets you apply filters on datasets present on the current page. The Filters Panel lists all the fields of datasets present on the current page, irrespective of the visualizations. To learn more, refer to section - Basic Concepts and Terminology |
| 15 | Data Panel | Lists all the DataSets of your current App. You can also create formulas on these datasets from this panel. All columns and visualizations on datasets can be accessed from this panel. To learn more, refer to section- Basic Concepts and Terminology |
| 16 | Visualizations Panel | To configure the visualization selected on the floor. To learn more, refer to section- Basic Concepts and Terminology |
| 17 | Page Navigation Bar | To navigate Pages by clicking on the  and and  icons on the bottom right corner of the Gathr application window. Go to the first or last page using the icons on the bottom right corner of the Gathr application window. Go to the first or last page using the  and and  icons. icons. |
| 18 | Execution Graph | Click on  icon to see the relationships between operations performed, datasets generated by these operations and the formulas applied on them. icon to see the relationships between operations performed, datasets generated by these operations and the formulas applied on them.To learn more, refer to section- ‘Exploration History’ |
| 19 | Footer | It is at the bottom of the Gathr application window. Right-click anywhere on the empty part to get the Floor menu. |
| 20 | Pages (Shown as Tabs) | All the pages in your App are shown as ‘Tabs’ at the bottom of the Gathr application window. These tabs are named and numbered. You can navigate to a page by clicking on the tab. You can rename, delete, hide and reorder these tabs. To learn more about operations on tabs, refer to section- ‘Starting with your first App’. |
| 21 | Managed Named Filters | You can create, edit, delete “Named Filters” by clicking on the icon. Gathr allows you to apply filters on data in your Apps. When you create and apply a named filter, the data will be filtered in your view only without impacting other users. You can share a named filter with other users, who can see the filtered data by applying the named filter. To know more, refer to section- ‘Share and Collaborate’. |
| 22 | Enable/ Disable App Execution | This option is useful when you don’t want to inadvertently change the data in the App by executing any existing or new operation. Click on the  icon to toggle between Enable/Disable execution of operations in the current App. icon to toggle between Enable/Disable execution of operations in the current App. |
| 23 | List of All Pages | Click on  icon at the bottom left corner to see the list of all the visible, hidden, and grouped pages/tabs. icon at the bottom left corner to see the list of all the visible, hidden, and grouped pages/tabs. |
| 24 | Floor | It is the work area available in Gathr where you can run operations on the connected tools, create visualizations and analyze data. |
| 25 | Floor Menu | This context-sensitive menu provides you with operations provided by Gathr and tools connected using connectors. To learn more, refer to section- Basic Concepts and Terminology |
| 26 | Left Panel | Left Panel is the space where you can drag and drop a form or a container, and it will remain there even when you navigate across pages/tabs Note: Input forms are by default opened in the Left Panel. |
| 27 | Containers | A Container is the rectangular box that contains the visualizations (e.g., Grid, Pie, Bar, etc.) You can have multiple Containers on a page. You can move, resize, rename, and delete a container. To learn more about creating multiple visualizations, refer to section- ‘Basic Concepts and Terminology’ |
| 28 | Visualizations | Visualizations are graphical representation of your data. Visualizations help you understand the trends and patterns in data. Gathr offers a wide range of visualizations like Pie, Bar, Line, Treemap, Pivot, Network Graph, Gantt chart, Word cloud, etc. To learn more about creating multiple visualizations, refer to section- ‘creating a visualization’ |
If you have any feedback on Gathr documentation, please email us!